(C) 2004 Hank Wallace
There’s a lot of trade talk about pickups. This one’s “hot”, that one’s “mellow”, the other one’s “smooth”. But how do pickups work? What makes them go?
At the core of magnetic pickups are magnets, of course. You have seen pickups on display in a music shop where you can see the thin copper wire coiled around the pickup body. So we have magnets and a coil of wire as the main components of a pickup.
The basic science behind pickup function is Faraday’s Law of Induction. It states that a changing magnetic field causes an electric field to be set up in a nearby wire, causing a current to flow if the wire is part of a closed circuit (a loop of wire for example).
Perhaps in science class you connected a meter across a coil of wire, then swiped a magnet near the coil. The changing magnetic field caused the meter’s needle to jump. Energy of motion (your moving hand) was converted to electricity through the motion of the magnetic field. That’s how electric generators work.

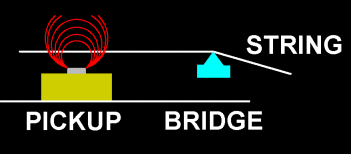
The picture shows a very simplified view of the pickup end of a guitar, including the pickup, bridge piece and string. The red lines represent the magnetic field of the pickup (a single coil pickup for discussion). The magnetic pole pieces you see on your pickups actually extend all the way through the pickup’s wire coil.
Since Faraday’s Law tells us we need a changing magnetic field to make an electric current, how does the magnetic field from the static permanent magnets change? That’s where the string comes into play.
See, the string is made of nickel and steel (iron+carbon), materials that are ferromagnetic. That is, a magnet attracts guitar strings. When this ferromagnetic metal vibrates in the magnetic field of the pickup, that disturbs the red field lines which also cross through the coil (not shown). That changing magnetic field makes a current flow that tracks the vibration of the string, and we have a working pickup!
Vibrating Strings
I’ll get back to pickups in a moment, but let’s look at the physics of a vibrating string, which is very interesting and easy to grasp. Your understanding of how your instrument works will make this crystal clear. Understanding a vibrating string helps us understand how the pickups sound.

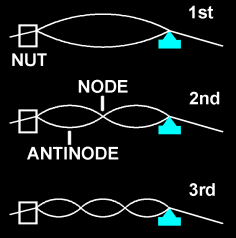
The picture shows three situations. The top diagram shows the first harmonic of the string’s pitch, called the fundamental. This is the note you hear when you pluck an open string. (The extents of the oval indicate the movement of the string as it vibrates.)
The diagram labeled “2nd” is the second harmonic. The string can only vibrate at whole number multiples of the fundamental pitch (1x, 2x, 3x, etc.). You cannot see it very well in a vibrating guitar string, but there are fat and skinny spots. The point of minimum movement is called a node. The point of maximum movement is called an antinode. The number of the harmonic is found by counting the number of antinodes on the string.
The diagram labeled “3rd” shows the third harmonic, which has three antinodes.
Important: The string does not move at a node. That means, once you get the string vibrating at the second harmonic, you can touch the string exactly at the node and it keeps on making sound!
Now you can easily create and listen to these harmonics on your instrument. Plucking any open string voices the fundamental. Put your finger lightly on the string at the twelfth fret and pluck the string. The higher pitch is the second harmonic. The node is right over the twelfth fret. Pluck the harmonic and touch the pick to the string at the twelfth fret. Notice that the tone keeps ringing. The node point on the string is not moving!
The third harmonic is had by plucking the string and muting it at the seventh fret. This is another node.
Back to Pickups

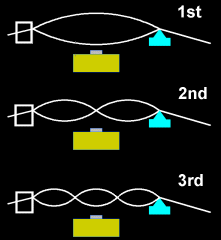
Let’s see how the nodes interact with the pickup’s operation. The next picture shows the same three harmonics with the pickup positioned midway along the string (not realistic, but good for illustration).
Remember that the pickup only detects string vibration when the string is vibrating near the pickup. (OK, duh.) In the top and bottom diagrams, the fundamental and third harmonic, the string is moving a lot in the pickup’s vicinity. But for the second harmonic, the pickup is situated over a node, meaning that the pickup does not hear the second harmonic. How interesting!
Now this diagram is vastly oversimplified. In real life, when you pluck a string it vibrates in the fundamental, second harmonic, third, fourth, etc., all a the same time. But the pickup ignores the tones that have a node where the pickup is positioned. This has the effect of filtering the tones on the string.
Look at the diagrams and you can see (with a little thought) what happens to higher harmonics. For example, every odd harmonic will have an antinode near the pickup and will make it to the guitar amp. But every even harmonic will have a node near the pickup and will be silent. So this pickup positioning filters out all the even harmonics.

When there are two pickups being used, the situation gets even more interesting. Pickups are usually mounted close to the bridge, so each one is seeing the fundamental in some measure. That is, the string is moving either toward or away from all the pickups at the same time. This causes the signals coming out of the pickups to add together.
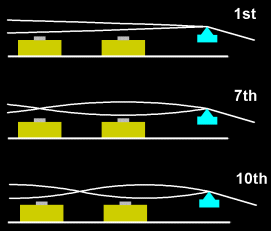
For the seventh harmonic, we see that the pickup on the right is at an antinode, getting a lot of signal, and the pickup on the left is at a node, putting out little signal. This harmonic comes across strong.
For the tenth harmonic, we see that the pickup on the right has the string moving away from it when the other pickup has the string moving toward it. This causes the signals from the pickups to cancel, so this harmonic is reduced in volume.
You can see that the distance between the pickups affects which harmonics will add and which will cancel. That’s why pickup positioning is so important if you are trying to mimic the sound of a vintage instrument.
As stated, a string produces loads of harmonics when it is plucked, so this two pickup system does a lot of filtering. This is the source of the Stratocaster® sound had with the 5-way switching (more detail below). The filtering occurs in humbuckers, too, but at a much higher frequency because the two pickup coils are much closer together. That’s partly why humbuckers have a more mellow sound with less high end than single coil pickups — the higher harmonics are canceling.
Adding another layer of complexity, there are actually two of these filters on each string, one determined by the bridge-pickup distance, and the other determined by the distance from the pickup to the fretted position on the string, which of course moves constantly as you play. For every string, at every fret, there is a pair of filters that determine with the pickups how the string sounds.

The picture shows a string vibrating over a pickup, viewed end-on. It’s even more interesting because when you pluck a string, the string does not vibrate in a plane (red line), but in any number of planes, or circles (green), or ellipses (white). In fact, the ellipses can even rotate around their center as the note decays. This means that the harmonics you hear also depends on how you pick the string, but you knew that already.
When we add to that all the variations on pickup construction (magnet type, magnet position, magnet strength, wire size, number of turns on the coil, pickup position in the guitar), it’s apparent that billions of sounds are available.
How do Humbuckers Work?
A common question from guitarists is, “How do humbucking pickups work?” The design of humbuckers is a clever innovation from decades past. The humbucking pickup passes the vibration of the guitar string while attenuating the hum and noise present all around the guitar, from power lines and other electronic devices. How is this possible?
The humbucker uses two coils of wire to pick up the guitar strings’ vibrations. However, the magnets are installed in the two coils in opposite polarity, such that they produce signals that are effectively out of phase in each coil. If the coils are connected correctly, signals from the strings add together from the two single coils. But electromagnetic fields hitting both single coils from external sources, like lighting fixtures, cancel out because of the way the coils are interconnected. Thus, the good guitar signal is double the strength that would be had with a single coil alone, and the interference is cancelled to a great extent in the process.
What’s the Secret Behind 5-Way Pickup Switching?
I remember when I got my first Stratocaster®. A friend told me how some guitarists I admired set the 3-way switch between the first two or last two positions to get what they called an “out of phase” sound. I tried it and fell in love with that sound. I even made one T-shirt that said “I Found the Sound”, using the Fender “F” (don’t tell the lawyers, but I cut the “F” out of some iron-on material myself — I must have been 16). None of my buddies at school understood, and I have long outgrown that shirt, but the sound remains.
What produces that sound? The 3-way switch had what engineers called “make before break” operation. That means that when switching between two pickups, it connected them both together for an instant before switching to only the next pickup. This avoided an annoying break in the sound while switching pickups. I suppose that Leo Fender did not want to be receiving tech support calls on those new guitars, especially since the Asian tech support call center had not yet been invented! (Thank you Michael Dell. NOT!)
When two pickups are connected together, as discussed above, there is a filtering of the signals that is a function of the distance between the pickups. The 3-way switch on a Les Paul guitar has much the same effect in the middle position, but the sound is different because it is combining two humbuckers which are spaced farther apart. Note that the pickups are NOT connected out of phase. If you rewire a guitar for that operation you will find the bass response greatly diminished. It’s just the physics of filtering that creates that signature sound.
We have 5-way switches today and they make getting that sound easy. The switch manufacturers simply added a couple more detents to the original 3-way switches. The wiring is the same!
What about Magnet Type?
There are many types of magnets in common use. Ceramic magnets are inexpensive, but brittle and not too strong magnetically. These are commonly used in crafts and as refrigerator door magnets.
Other common types are:
- aluminum nickel cobalt [AlNiCo] (inexpensive)
- samarium cobalt (strong but expensive)
- neodymium boron iron (strongest and expensive)
There are some trade offs involved in pickup design. First, a stronger magnet means that fewer turns of wire are needed for a certain audio output. That means that the pickup can be smaller. If the pickup is made in some standard size, a stronger magnet produces more audio output.
However, the stronger magnet types are much more expensive. That’s why most pickups use less expensive AlNiCo magnets.
Also, stronger magnets are not the cure-all for electric guitar. Since the guitar strings are ferromagnetic and are attracted to the magnets, the pickups affect the vibrations of the strings, which is bad since the pickups are only there to sense the vibrations, not change them. To get a feel for this, adjust a guitar’s neck pickup until the pole pieces are very near (It might seem smart to choose the strongest magnet, neodymium boron iron, and make a pickup so hot that you could plug a 100 watt light bulb into your Les Paul. But that magnet will either affect the strings adversely, or you’d have to make it so small that its magnetic field would be too concentrated. Weaker magnets necessarily must be larger in diameter to be usable, and they produce a broader field that is tolerant of the strings’ movement while being plucked and bent.
